
Make Your Own Masquerade Mask
- Clockwork and Gears Vintage Dancing
- Apr 29
- 9 min read

Updated: May 23
Masquerade balls have a rich history dating back to Renaissance Europe. Decorative masks allowed guests to conceal their identities, creating an air of mystique and intrigue amid the revelry. Masks were often made from paper mache, porcelain, or leather and adorned with feathers, gold-leaf, beads, and other embellishing materials. Though masquerades are not as popular today as they once were, the tradition persists. If you ever have the opportunity to participate in such an event, you will need a mask for the occasion. This tutorial can help if you would like to try your hand at making your own using paper mache. Though we do not profess expertise on historic mask making techniques, we have developed a method to make beautiful masks that will be a perfect fit for your face and creative vision.
Step 1: Prepare Paper Strips and Paper Mache Paste
You will want to start by preparing your materials. A variety of different papers and paste recipes could work for this process. If you want to follow what we did exactly, we used pieces of regular printer paper that we salvaged from a recycle bin. We then tore these into strips. Because tearing is not as neat as cutting with scissors, the rough edges of the torn paper allows the paste to absorb into the paper more easily. For our paper mache paste, we used a 1 to 1 ratio of flour and water. 1/2 cup flour and 1/2 cup water made plenty of paste for a single four layer mask, with some left over. If you live in a humid climate, you may want to add salt to the paper mache mixture or seal the mask before decorating it to prevent mold issues.
Step 2: Cover Your Face with Plastic Wrap

To prevent the paper mache part of the process from turning into an accidental wax job—with your eyebrows and eyelashes as unfortunate casualties—you will want to cover the upper half of your face with plastic wrap. Applying petroleum jelly to your face before placing the plastic wrap will help ensure it holds smoothly in place. Caution: to ensure ease of breathing, do not cover your nostrils. We will not be held liable if you asphyxiate yourself through crafting negligence.
Step 3: Apply Paper Mache Strips Over the Plastic Wrap

Find somewhere to lay down where you can make a mess but also be reasonably comfortable. We laid out yoga mats and covered both the mats and the pillows with towels to catch the paper mache spills.
After setting up the area, you will probably want to recruit a crafting assistant to help you with the paper mache. While it may not be impossible to do it yourself, it is much easier with help.

Make sure strips are applied smoothly with no gaps between the plastic wrap, especially around the eyes and against the nose. Just be very gentle when applying strips over the eyes. Extra space under the mask around the eyes and nose will cast a shadow over your eyes when wearing the mask. Pinching the paper mache strips in along the bridge of your nose when applying them will help prevent this. Also, because the cheeks raise with smiling, you may want to smile when the paper mache strips are applied to your face. Otherwise, any movement of the zygomaticus muscles may shift the mask when you are wearing it.
Blow-Dry
Thoroughly blow-dry each layer before applying the next one. Excess dampness between layers will make the mask less inclined to hold its shape when removed from your face.
Repeat
Apply several layers of paper mache strips to ensure a sturdy mask. For our masks, we did four layers of standard printer paper. If you are using a thinner type of paper, you may want to use more layers.
Step 4: Aluminum Foil Cast and Dry
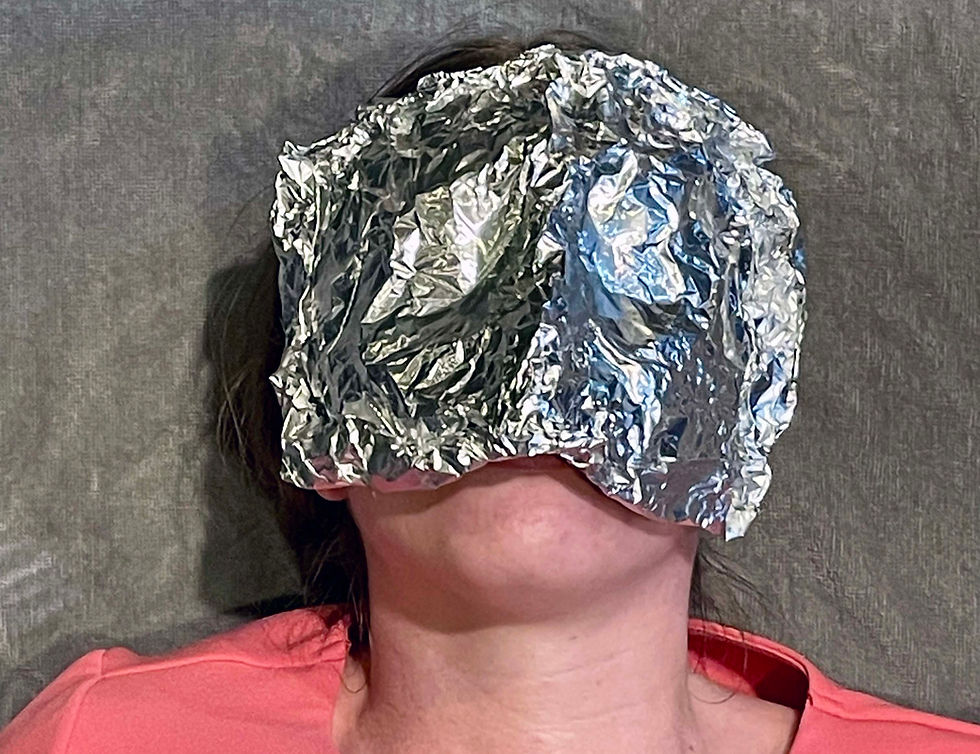
Though the mask should already be mostly dry from blow drying, we found that the mask did not dry completely while being worn. Before removing the mask, press several layers of aluminum foil onto it to create a supportive foil cast. Then, you can pull it off your face and gently remove the plastic wrap from the inner layer of the mask.

Put a few supports under the foil and set the mask aside somewhere to ensure it remains undisturbed by gravity, pets, or other interferants that could misshape it. Cups, Pringle cans, or other generally cylindrical objects make great supports. Let the mask dry for at least a day or two before continuing to step 5.
Step 5: Shape the Mask
Once the mask is completely dry, you can start shaping it.
Trace the Current Shape of the Mask
Obtaining a trace of the current shape of the mask will ensure the pattern you draw for the mask will stay within the edges of the paper mache material. Since the mask is 3D and the paper is 2D, you will need to roll the mask over the paper as you trace the edges.
Next, cut out the traced shape, flip it over, and make sure it approximately fits the shape of the mask. Make adjustments as needed.

Sketch and Cut Template
Fold the mask template in half with the fold centered along the nose. Draw the shape you want to use for the mask, then cut it out before unfolding to create a symmetrical pattern.

Example Templates


Trace the Template onto the Mask

Tracing the pattern onto the mask is a little bit of an imprecise art. You kind of have to move the pattern around, push it down in different spots to get a good fit, and then approximate the tracing. It can help to have someone else hold the nose part down while you are tracing the edges. It might also help to use masking tape to attach the template to the mask, but this will prevent you from tracing the points where the tape is attached.
Trim the Paper Mache

Cut the mask into the shape you drew using the pattern. We used a variety of different cutting implements and found that larger scissors worked best on the straight areas and larger curves, smaller scissors worked best on tighter curves, and a box cutter was most ideal for cutting the eyes and the bottom part of the mask that rests on the nose.
Safety Note: Use care that you do not cut yourself while trimming the mask. The paper mache dries into a very hard material that is not easy to cut. You will need to be careful with how you hold the mask to ensure your hands and fingers stay out of the range of sharp cutting implements.
Also, we observed that sometimes the cutting process causes small fragments of paper mache materials to break off and scatter unpredictably. There is a risk that these can fly into the eyes. While paper mache dust is not the most hazardous material you could get in your eyes, it is still irritating—speaking from experience here. Best practice would be to wear eye protection, especially if you have unilateral blindness or some other circumstance that would make an eye injury particularly devastating.
Step 6: Decorate the Mask
This is the most exciting part of the mask making process. You can customize your mask to look however you want. You might consider looking at our example masks below and browsing photos of other masquerade masks on the internet to find inspiration for yours. Ultimately, you can use any materials or design features that you desire, but we have listed a few suggestions below.
Using Fabric
Fabric is an especially good material for decorating your mask and works great to give it a smooth finish.
Prepare your Fabric
You can use your mask template to determine how much fabric you need to cover the mask. Cut around the template with approximately an extra ½ inch of fabric that can be rolled over the edges of the mask. If you are using a fabric that is prone to fraying, apply some Fray Check around the edges after cutting it.
Start Gluing Key Areas
Next begin gluing the fabric to the mask. We used a glue gun with a low heat setting so we could touch the glue without getting burned. Start by applying a short line of glue on the inside of the mask on the center top. Roll the fabric over the edge of the mask and press it against the glue. Before applying glue to the bottom center of the mask, pinch the fabric into the nose of the mask so the fabric is pressed smoothly against it. Then, apply the glue and roll the fabric over the bottom center edge.


Next, cut slits where the eyes are and trim out a little of the fabric within the boundaries of the eyes. Just be sure to leave plenty of edge that can be rolled over and glued down to the back of the mask. If you are using a stiff, non-stretchy fabric, trimming sunburst cuts around the edges of the eye will also be helpful. If using a fray-prone fabric, you will want to apply Fray Check after cutting the eyes.
When gluing the eyes, make sure the fabric is pinched smoothly over the bridge of the nose, and start by first gluing the inside corners of the eyes. Then, proceed to apply short sections of glue along the rest of edges of the eyes and roll the fabric over onto the glue.

Finish Gluing the Rest of the Edges

Finally, finish gluing the outside edges of the mask, one section at a time, working your way around the mask. Throughout the process, make sure you smooth the fabric over the front of the mask before rolling the edge over onto the glue on the back.
Using Clay
An airdry or polymer clay could be used to sculpt custom shapes and textures to decorate your mask.
We used a 1/2 batch of a home-made clay recipe that we found online for one of our masks. The original recipe calls for 1 cup cornstarch, 1 cup PVA glue, 1 tablespoon vinegar, and 1 tablespoon vegetable oil. These are mixed together and heated up on a stove on medium-low heat until it the texture goes lumpy and then eventually starts to pull away from the sides. It is then cooled on a silicone pad. Once cool, sprinkle it with cornstarch and kneed in additional corn starch until it stops feeling sticky.
Options for Embellishment
Decorative trims, feathers, rhinestones, stick-on embellishments, and small silk flowers are all excellent options to use in the design of your mask.
Step 7: Add Ribbons to Tie on the Mask

Grosgrain ribbon is what we recommend for attaching your mask to your face. Though satin ribbons are beautiful, they are more likely to come untied than the more textured grosgrain. You could also use elastic, but in our experience, ribbon holds the mask better, is easier to put on, feels overall more comfortable, and looks fancier.
You can obtain a sufficient length of ribbon by wrapping a section of ribbon around your forehead and then tying the two ends together behind your head in a bow. Cut the ribbon once you have the correct length. Next, find the mid point of this ribbon and cut it in half. Glue each half of the ribbon to the back of the mask, one on each side.
Optional Step 8: Apply a Finishing Layer to the Back of the Mask

If desired, you could use vinyl, felt, fabric, or a thin layer of craft foam to line the back of the mask. Use the mask template to trace the shape of the mask onto the material you plan to use. Cut the material slightly smaller than the size of the template so its edges will be well hidden behind the mask. Finally, glue the material to the back of the mask.
Example Masks for Inspiration
This dove-inspired mask was created by first covering it with a layer of white fabric. Some white lace was then added over the fabric. Feathers were glued to the back of the mask, and stick-on embellishment strips were placed to enhance the design.

This gold mask was made by covering it with gold fabric. Gold trim was then added around the edges.

This mask was decorated by covering it with a layer of silvery fabric. Silver trim was added to the edges, and feathers and fake flowers were glued to the side.

This faux-bark mask was decorated by covering it with the airdry clay described above and drawing bark lines into the clay. It was then painted—first with a layer of black, and then dry-brushed with layers of medium brown, tan, and a light honey brown.

Need an occasion to wear your mask?
Clockwork and Gears Vintage Dancing will be helping run the Adult Night Out Fae Masquerade at the Viridian Event Center in West Jordan, UT on 5/22/26. It is a free event, but registration is required due to space limitations. More details are available on the Salt Lake County Library website.
If you are reading this after the Fae Masquerade has passed, don't dismay. We frequently teach at a variety of different historic dance events, fantasy balls, masquerades, and conventions. You can check out our events page or our schedule to see a list of all our upcoming events. Perhaps you could wear your new masquerade mask at one of these.

Comments